
Setting up your audio software
In order to make use of ASIO4ALL, you need to configure your audio software accordingly. How you would do this depends on your particular software application. Generally, you would always enter the audio configuration menu and select ASIO -> ASIO4ALL v2.
There now should be a button to launch the ASIO control panel. How this button is labeled depends on your particular software. Once you press this button, the ASIO4ALL control panel should appear. Please consult the manual of your audio software for further assistance, if necessary!
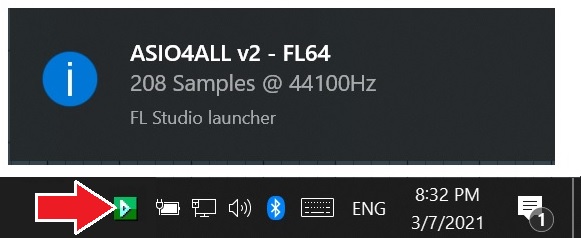
There is, of course, a much easier way for accessing the ASIO control panel at any time. This mechanism has been around for almost 15 years now – with no known compatibility issues: Simply launch the control panel by clicking on the ASIO4ALL status icon in the System Tray area!
The tray icon will become visible whenever an application initializes the ASIO4ALL driver. If there is no tray icon, your audio application is not currently using the ASIO4ALL driver. You can disable balloon notifications by switching to “Advanced” mode in the ASIO4ALL control panel.
Setup Guide for ASIO4ALL on Popular DAWs and DJ Software
- Open Options → Audio Settings
- Select ASIO4ALL v2
- Click Show ASIO Panel
- Enable your audio device
- Open Options → Preferences
- Open the Audio tab
- Set Driver Type to ASIO
- Select ASIO4ALL v2
- Click Hardware Setup
- Open Options → Preferences
- Select Audio → Device
- Set Audio System to ASIO
- Select ASIO4ALL v2
- Open Studio → Studio Setup
- Select VST Audio System
- Choose ASIO4ALL v2
- Open Options → Audio Setup
- Select ASIO4ALL v2
- Click Control Panel
- Open Setup → Playback Engine
- Select ASIO4ALL v2
- Click Hardware Setup
- Open Settings → Audio
- Select ASIO
- Choose ASIO4ALL v2
- Open File → Preferences
- Select Sound Device
- Choose ASIO Driver
- Select ASIO4ALL v2
- Open Settings → Audio Devices
- Select ASIO
- Choose ASIO4ALL v2
- Open Edit → Settings
- Select the Audio tab
- Choose ASIO
- Select ASIO4ALL v2
- Open Preferences → Audio Setup
- Select ASIO as the driver
- Choose ASIO4ALL v2
- Click ASIO Panel to configure your outputs
- Open Preferences → Sound Hardware
- Select ASIO4ALL v2 as the driver
- Configure input/output channels in the Mixxx ASIO settings
- Open Settings → Audio
- Set the Audio Engine to ASIO
- Select ASIO4ALL v2 as the device
- Open Setup → Audio
- Choose ASIO driver
- Select ASIO4ALL v2
- Configure channels if necessary
- Open Preferences → Audio
- Select ASIO as the driver
- Choose ASIO4ALL v2
- Open Settings → Audio
- Select ASIO driver
- Choose ASIO4ALL v2
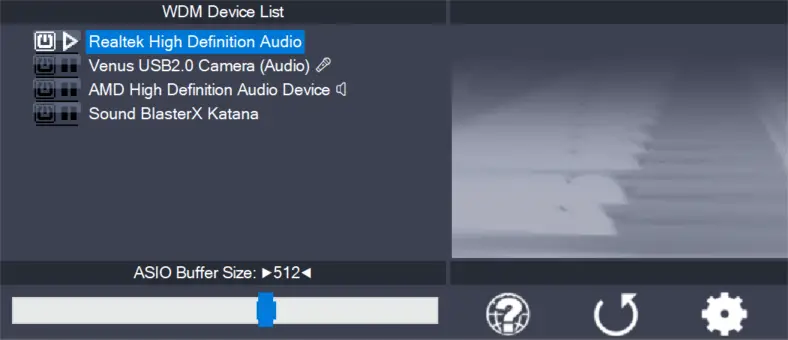
Changes made in the control may not have an effect until you restart the audio application. Once you made it into the ASIO4ALL control panel – one way or the other – you can now proceed with some basic configuration.